Pseudo-elements especially ::before and ::after are so hot right now. However, lots of beginners don’t fully grasp their power. So, before you can harness their power you first need to understand how they work.
When I first started working with pseudo-elements, I had no idea what I was doing or how they actually worked. I was just copying and pasting other people's code and not really understanding why it was or wasn’t working.
If you want to harness the power of CSS and get good at it then understanding pseudo-elements is a must. By the end of this post you will have a strong grasp of what pseudo-elements are and how to use them to create stylish elements yourself.
But first, let’s explore what they are.
What are Pseudo-Elements
In CSS pseudo-elements are a keyword that you add to selectors. These pseudo elements let you style specific parts of the element you selected. CSS denotes them using two colons :: which helps you tell them apart from CSS pseudo-classes as they have only one colon :.
Let’s look at the general syntax for CSS pseudo-elements before we get into specific pseudo-elements.
Syntax
selector::pseudo-element {
  property: value;
}
As you can see, you put the CSS selector before the double colon. Next, inside the curly braces you write CSS property value pairs, like you would for any other element you are styling.
As a real example, we could do something like below.
.second::selection {
  color: #fff;
  background-color: mediumspringgreen;
}
The example uses the ::selection pseudo-element on the second CSS class selector. Now, when you highlight the paragraph text it is a different color and background.
We’ll explore the ::selection pseudo element some more later. For now I want you to focus on the two major pseudo-elements ::before and ::after.
What are the before and after pseudo-elements?
The before and after pseudo-elements let you insert content onto a web page. They allow you to do this without the need for it to be in the HTML. Essentially you can insert content through CSS.
One important thing to note when it comes to the before and after pseudo-elements is that when they are created they are not actually on the DOM. In other words, they are fake elements, this is why they are call “pseudo” elements as the word pseudo means fake. So, the name fits because these elements don’t actually change anything in the document. They are hidden elements that are only visible to the user and not the DOM.
What this looks like in practice is this.
h1::before {
  content: ‘before’;
}

h1::after {
  content: ‘after’;
}
The result would be something like this.
<h1>
  before
  <!--actual h1 element -->
  after
  <h1></h1>
</h1>
Knowing that these elements are fake it’s time to look at the first fake element you will use a lot in web development, the before pseudo-element.
The before pseudo-element
In CSS, ::before creates a pseudo-element that is the first child of the selected element. To put it another way, it is a pseudo-element that comes before the content of the CSS selector. So if you have a paragraph element it would look like this p::before with p being the selector and ::before being the pseudo-element.
With this in mind let’s look at some examples.
<p>
  Mr. and Mrs. Dursley of number four, Privet Drive, were proud to say that they
  were perfectly normal, thank you very much.
</p>
p {
font-size: 14px;
color: #7f0909;
background-color: #ffc500;
}
p::before {
content: "the boy who lived";
text-transform: uppercase;
font-size: 130%;
background-color: #5bc8f8;
border: solid black 1px;
}Result

From the code above, we have added the content 'the boy who lived' before the CSS selector which in this case is the p tag and its content.
We were then able to style the content before the selector however we wanted.
If we check the developer tools in the codepen, you will see that there is no element 'the boy who lived'. There is just a pseudo-element `::before`. As it isn't really on the DOM.

Let's look at another example.
<h1>harry potter and the sorcerer's stone</h1>h1 {
display: inline-block;
text-transform: uppercase;
}
h1::before {
content: "";
display: block;
background: #ffc500;
height: 5px;
width: 100%;
}Result

In this example, the before pseudo-element is using the display property with the value block. This then moves the background with a width of 5px above and before the h1 element.
Now you know what the before pseudo-element does let's look at the after pseudo-element.
The after pseudo-element
In CSS, ::after creates a pseudo-element this is the last child of the selected element. So much like the ::before, it is a pseudo-element that comes after the content of the CSS selector.
Keeping that in mind let’s use the second example from the before section and add a line underneath with the after pseudo-element.
h1::after {
  content: "";
  display: block;
  background: #ffc500;
  height: 5px;
  width: 100%;
}
Result

We now have a line under the h1. How cool is that, we can make our own little styling elements to create great looking elements.
By now, you should now have a good understanding of how the ::before and ::after pseudo-elements work. To further improve our knowledge we need to understand what the content property is and what it is doing.
Content property
Did you notice the use of the content property, with the ::before and ::after pseudo-elements? Objects that are inserted using the content property are anonymous replaced elements. Put in simpler terms, it is an element whose content is not affected by the current documents styles.
Thus, when using the ::before and ::after pseudo-elements, you must use the content property to make your styles visible. Did you also notice that the content is inside the element? In spite of the fact that the naming of ::before and ::after make it feel like the content should come before or after the element. But, it is definitely before or after the content inside the element.
Next, to better understand the content property let’s look at what values it takes.
Content Property Accepted Values
The content property takes many types of values. The default value is normal. It means 'normally' nothing will be visible to the user. Thus, you give the content property one of the values below.
The other values content can be are:
- A string - this sets the content to be the string you specify.
- A counter - used to style lists.
- An image - this sets the content to be an image you specify with a
url()orgradientdata type. The image is inserted at its exact dimensions, meaning you cannot resize the image.- please note that to insert alt text you use a
/after theurl()and a string description of the image. For example:content: url("https://www.example.com/test.png") / "This is the alt text";
- please note that to insert alt text you use a
- Nothing - Useful for inserting images as background-images (set width and height, and can even resize with background-size), or making other cool styling features.
- A attr() value - Sets the content as the string value of the selected elements attribute.
Other awesome pseudo-elements
Selection
::selection: - This, CSS pseudo-element applies styles to the part of a document that has been highlighted by the user. To put it another way, it makes the highlighter on your page look pretty when people highlight text to copy.
::selection {
  background-color: cyan;
}
First-letter
::first-letter - CSS pseudo-element applies styles to the first letter of the first line of a block-level element, but only when not preceded by other content (such as images or inline tables).
To rephrase the above, this pseudo-element lets you style the first letter of the first line of the element you select. This only happens on elements that are categorized as lock-level elements check that link out for a list of block level elements.
As a result, we can use this pseudo-element to make awesome drop caps for our paragraphs, see the example below.
p {
  width: 600px;
  line-height: 1.5;
  font-weight: 500;
}

p::first-letter {
  color: white;
  background-color: rgb(55, 97, 117);
  border-radius: 3px;
  box-shadow: 3px 3px 0 rgb(212, 173, 81);
  font-size: 250%;
  padding: 6px 3px;
  margin-right: 6px;
  float: left;
}First-line
::first-line - CSS pseudo-element applies styles to the first line of a block-level element.
In plain English the above means, this pseudo-element lets you style the the first line of the element you select. Again like with first letter this only happens to block level elements.
Let's add the below code to the first-letter example.
p::first-line {
  color: red;
}
Result
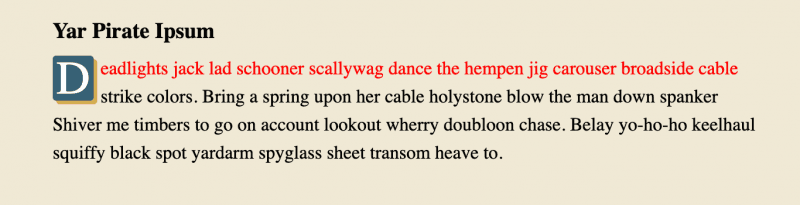
As you can see, the p now has drop caps and red text for the first line. Play around with width in the pen above to see what happens as you increase and decrease the width.
Did you notice how if the text moves lines the color changes? You have to be careful taking into consideration things like the width of the element and how it will respond on different screens when styling the first line.
Marker
The ::marker CSS pseudo-element selects the marker box of a list item, which typically contains a bullet or number.
The marker pseudo-element will allow you to replace the counter content value. For an example on how a counter works I encourage you to check out this post. That said, a counter is just the bullet point or number in front of a list item (<li>) and the ::marker pseudo-element lets you style them.
Let's look at an example.
<h3>Nintendo Hero's</h3>
<ul>
  <li>Mario</li>
  <li>Link</li>
  <li>Samus</li>
</ul>
ul li::marker {
color: #e4000f;
}The above example is pretty simple, we have just changed the bullet point color to red. But, you can do lot's of things like change the style or even use emoji's.
Finally, it is important to note that the ::marker pseudo-element is not fully supported at the time of writing this.
Summary
Now you should have a good understanding of pseudo-elements. Let’s recap on a few important notes.
Firstly, pseudo elements let you style specific parts of the element you selected. Pseudo-elements are denoted by double colons.
Next, remember that pseudo-elements do not appear in the DOM as they are fake elements. The way you make them visible to the user is to utilize the `content` property.
Lastly, go forth and have fun making amazing things with pseudo-elements.